Usually you may want to trial out Google apps for work or Google apps for education before switching over fully. (Google offers a free 30 days trial for Google apps for work for 10 accounts . You can contact us if you want us to help you set up Google Apps for your domain).
During the period of trying out Google apps, you will most likely have to set up a dual delivery or split delivery to ensure you are receiving emails in both your current mail service as well as throught Google Apps.
This tutorial focuses on setting up email aliases (mail forwarders) for cPanel (Webmail) users. This is actually part of the five step process involved in setting up Google Apps on your domain, the steps are :
1. Sign up for Google apps for work (you can contact us to help you do this for FREE)
2. Verify your domain – view this tutorial on how to verify your domain on cPanel.
3. Add up to 10 user accounts on Google Apps
4. Create domain aliases (actually its mail forwarders) for the users (up to 10) – this is what this tutorial handles. If you want to create mail forwarders for a lot of emails then you should rather follow this tutorial – how to create multiple email forwarders on cPanel
5. Configure your MX record to enable dual delivery – view this tutorial on how to do this on cPanel
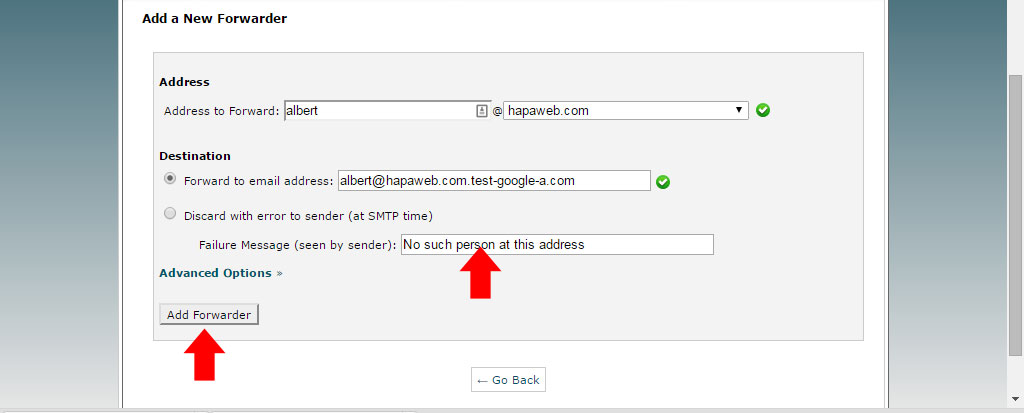
I assume you have completed steps 1, 2 and 3 above. Every account you create in Google apps has a default alias, the email alias address for each user@your_domain.com is user@your_domain.com.test-google-a.com for example, the domain alias for albert@hapaweb .com is albert@hapaweb.com.test-google-a.com. You will now have to add these alises to their corresponding accounts in cPanel. Follow the steps below to do this.
STEP 1: Log into your domain’s hosting cPanel via your-domain-name.com/cpanel and click on Forwarders

STEP 2: Click on Add Forwarder.

STEP 3: Put the name of the email address you wish to forward from in the first blank field. For example: for albert@hapaweb.com, put albert in the first blank field.

STEP 4: Under Destination , select Forward to email address and enter the corresponding Google Apps email alias. and click on Add Forwarder

STEP 5: You should see the confirmation message.

STEP 6: Click on Go Back and then follow steps 2 to 5 for all your 10 account


1 comment
Heba
Thank you for this awesome solution, I’ve been thinking about this for weeks until I found this article